Installing Sitecore using the Sitecore Install Framework (SIF) is generally a streamlined process, but it is not uncommon to hit a wall during the xConnect deployment phase. One of the most frequent and frustrating errors developers encounter is the failure of the Sitecore XConnect Search Indexer service to start.
When this happens, your PowerShell script terminates with a WriteErrorException during the Install-SitecoreConfiguration @xconnectParams step. If you are seeing this error, you are not alone. This guide will walk you through the root causes—ranging from license signature issues to Solr configuration pitfalls—and provide the exact steps needed to get your installation back on track.
Identifying the XConnect Search Indexer Failure
When SIF fails, it usually provides a generic terminating error in the console. The message typically looks like this:
TerminatingError(Start-Service): "The running command stopped because the preference variable "ErrorActionPreference" or common parameter is set to Stop: Failed to start service 'Sitecore XConnect Search Indexer - sc901.xconnect-IndexWorker'."
Install-SitecoreConfiguration : Failed to start service 'Sitecore XConnect Search Indexer - sc901.xconnect-IndexWorker'
To find the actual cause, you must look deeper than the PowerShell console. Your first stop should be the Windows Event Viewer. Under Windows Logs > Application, you will often find a SerializationException or a LicenseException. Alternatively, check the xConnect-specific logs located at:
C:\inetpub\wwwroot\[YourXConnectInstance]\App_Data\jobs\continuous\IndexWorker\App_data\Logs\
Solution 1: Update Your Sitecore License
The most common reason the IndexWorker fails to start is an incompatible or outdated license file. Even if your license worked perfectly for Sitecore 8.x or even Sitecore 9.0.0, it might lack the necessary signatures required for Sitecore 9.0.1 and later versions.
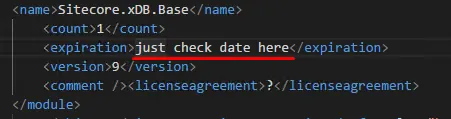
Check for Sitecore.xDB.Base
Open your license.xml file and search for the Sitecore.xDB.Base key. If this key is missing or if the expiration date has passed, the XConnect Search Indexer will refuse to initialize.
Request a Fresh License
If you find that your license is outdated, contact Sitecore Support. Request the latest copy of your license.xml from their CRM. The newer versions include additional cryptographic signatures required by the xDB and xConnect services introduced in newer Sitecore versions.
Note: Ensure the file is named exactly license.xml. SIF and the internal Sitecore services are often hard-coded to look for this specific filename. If your file is named Sitecore_License_2024.xml, rename it to license.xml before running the installer.
Solution 2: Unblock DLLs and File Permissions
If your license is valid but the service still won't start, the issue might be related to Windows security features. When you download Sitecore installation packages from the internet, Windows often "blocks" the DLLs for security reasons.
Navigate to the IndexWorker folder:
C:\inetpub\wwwroot\[YourSite]\App_Data\jobs\continuous\IndexWorker
Look for Sitecore.XConnect.Logging.Serilog.AppInsights.dll (or other DLLs in that folder). Right-click the file, select Properties, and check if there is an Unblock checkbox at the bottom of the General tab.
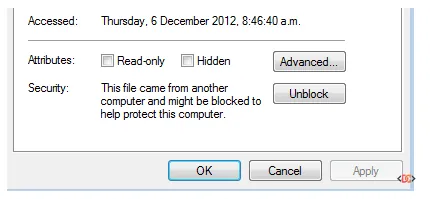
If you see it, check the box and click Apply. You can also unblock all files in the directory at once using PowerShell:
Get-ChildItem -Path "C:\inetpub\wwwroot\[YourXConnectInstance]" -Recurse | Unblock-File
Solution 3: Correct the Solr URL Format
In Sitecore 10.x installations, the XConnect Search Indexer might fail if the Solr URL provided in the SIF parameters is incorrectly formatted. The indexer is sensitive to trailing slashes and URL fragments.
- Incorrect:
https://solr-server:8983/solr/#/ - Correct:
https://solr-server:8983/solr
Ensure that your $SolrUrl parameter does not include the admin UI fragment (/#/). The service expects the base API path to communicate with the Solr cores directly.
Best Practices for Re-running the Installation
Once you have identified the fix, do not simply run the script again. SIF is not always fully idempotent, and attempting to install over a partial failure can lead to "Already Exists" errors or corrupted databases.
Before re-running Install-SitecoreConfiguration, perform a clean-up of the following:
1. IIS App Pools & Websites: Delete the Sitecore and xConnect instances created during the failed run.
2. Webroot Folders: Manually delete the folders in C:\inetpub\wwwroot\.
3. Databases: Drop the databases created by the script in SQL Server.
4. Certificates: If the script failed during certificate generation, check the Local Computer > Personal store and remove the failed certificates.
Frequently Asked Questions
Why does the service start manually but fail during SIF?
This usually indicates a timeout issue or a dependency that isn't ready. However, if the service fails to start even manually via services.msc, the issue is almost certainly the license or a missing DLL.
How can I debug the Indexer process directly?
You can try running the executable directly to see the console output. Navigate to the IndexWorker folder and run Sitecore.XConnectSearchIndexer.exe. This will often print the exact stack trace and error message directly to the command line, bypassing the need to hunt through logs.
Wrapping Up
The "Failed to start service Sitecore XConnect Search Indexer" error is usually a symptom of the environment not meeting the strict requirements of the xConnect service. By verifying your Sitecore.xDB.Base license, ensuring your Solr URL is clean, and unblocking your binaries, you can overcome this hurdle.
Always remember to perform a full cleanup of your environment before re-attempting the installation to ensure a consistent and successful Sitecore deployment.