When you are managing a SharePoint document library, views are your best friend for organizing data. However, many users encounter a frustrating hurdle: as soon as they apply a filter to a view—such as showing only 'In Progress' documents—all their folders suddenly disappear. This leaves you with a flat list of files, making it nearly impossible to navigate a structured hierarchy.
In this guide, you will learn exactly why this happens and how to configure your SharePoint views so that folders remain visible even when strict metadata filters are applied. Whether you are working on a legacy environment like SharePoint 2010 or the modern SharePoint Online, these techniques will ensure your document organization remains intact.
Why Folders Disappear When You Apply Filters
To understand the solution, you first need to understand how SharePoint treats folders. In a document library, a folder is technically an item, just like a Word document or a PDF. The main difference is its Content Type.
When you create a view filter—for example, Status is equal to Approved—SharePoint looks at every item in the library. It checks the 'Status' column for your documents, but it also checks that column for your folders. Since folders rarely have metadata like 'Status' assigned to them, they fail the filter criteria and are excluded from the results.
To fix this, we need to tell SharePoint that the filter should apply to documents unless the item being looked at is a folder.
The Solution: Using the Content Type Filter
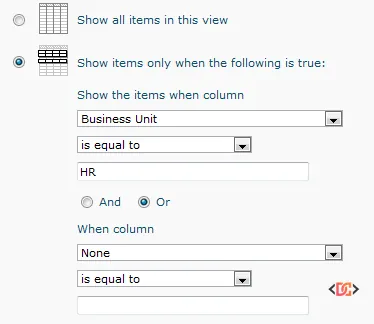
The most effective way to keep folders visible is to add an "OR" condition to your view settings. This logic tells SharePoint: "Show me items that meet my specific criteria OR items that are folders."
Step-by-Step Configuration
- Navigate to your Document Library.
- Click on the Library tab in the ribbon and select Modify View (or create a new one).
- Scroll down to the Filter section.
- Set your primary filter (e.g.,
YourColumn is equal to True). - Change the operator to Or.
- In the second filter row, select Content Type from the dropdown.
- Set the condition to is equal to.
- Type the word Folder in the value box.
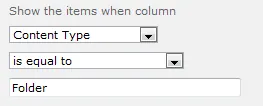
By adding this simple OR Content Type = Folder logic, SharePoint will now include every folder in the library regardless of what the other metadata columns contain.
Managing Complex Filters and Case Sensitivity
When working with more complex views, you might need to combine multiple conditions. For instance, you might want to show only documents related to a specific project and ensure the folders containing those documents are visible.
Dealing with Case Sensitivity
SharePoint's underlying architecture (particularly in versions like 2010 and 2013) can be sensitive to casing. When you type "Folder" into the filter value, ensure the "F" is capitalized. Users have often reported that using lowercase "folder" results in the filter failing to recognize the item type.
Example: Advanced Project Filtering
If you want to show documents for "Project ABC" while keeping folders visible, your filter logic should look like this:
- Content Type is equal to Folder
- OR
- Content Type is equal to Document
- AND
- Project Name is equal to Project ABC
Note that SharePoint processes these filters in a specific order. If you find that the OR/AND logic is not behaving as expected, you may need to use the "Name" column as a fallback. For example, adding a condition where Name contains ABC can help surface folders that are specifically named after the project you are filtering for.
How to Identify Available Content Types
Sometimes "Document" or "Folder" might not be the only content types in play. If your organization uses custom content types, you might need to adjust your filters accordingly. To see a full list of what is available in your library:
- Go to Library Settings.
- Select Advanced Settings.
- Set Allow management of content types? to Yes and click OK.
- Back in the Library Settings page, a new Content Types section will appear.
Common default types you might see include: * Document * Folder * Link to a Document * Picture * Video
Once you have identified the correct names, you can use them precisely in your view filters to include or exclude specific categories of files.
Version Context: SharePoint Online vs. SharePoint 2010
While the Content Type = Folder trick is a lifesaver for SharePoint 2010, 2013, and 2016, modern SharePoint Online (Microsoft 365) handles views slightly differently.
In modern views, there is a setting under the "Folders" section of the view edit page. You can choose between: * Show items inside folders: This is the default and respects the folder hierarchy. * Show all items without folders: This flattens the library, showing all files regardless of which folder they are in.
If you are in SharePoint Online and the Content Type filter isn't giving you the results you want, check the Folders section at the bottom of the view configuration page to ensure "Show items inside folders" is selected.
Frequently Asked Questions
Why does the filter hide subfolders too?
SharePoint filters apply to every level of the hierarchy. If a subfolder does not meet the filter criteria (and you haven't added the OR Content Type = Folder exception), it will be hidden just like a top-level folder. The solution provided above fixes this for all levels of nesting.
Can I filter to only show folders and hide all documents?
Yes. To create a "Folders Only" view, simply set your filter to Content Type is equal to Folder. This is very useful for high-level navigation pages where you want users to select a category before seeing any files.
What if 'Content Type' isn't in my filter dropdown?
You may need to add the Content Type column to your view first. Go to the Columns section of the view settings, check the box for Content Type, and save. It should then appear as an option in the Filter dropdown.
Wrapping Up
Maintaining a clean folder structure while using metadata filters is essential for a good user experience. By leveraging the Content Type column in your view filters, you can ensure that your navigation stays intact while still surfacing the specific documents your users need.
Key takeaways to remember:
* Folders are items that often lack document-specific metadata.
* Always use an OR condition with Content Type = Folder to keep folders visible.
* Pay attention to capitalization in filter values.
* In SharePoint Online, verify your Folders section settings in the view configuration.
By following these steps, you'll transform your document library from a confusing list of files back into a structured, easy-to-navigate professional repository.