
Connecting CiviCRM to external applications—whether it's a specialized mobile app, a custom WordPress plugin, or an automation tool like Zapier—requires a secure way to communicate. This is where the CiviCRM REST API comes into play. To use the API, you must authenticate your requests using two pieces of information: a Site Key and an API Key.
While the Site Key is unique to your entire installation, the API Key is unique to a specific contact record. Setting up an API key can seem daunting if you aren't comfortable editing database tables directly, but CiviCRM provides powerful built-in tools to manage this without touching a single line of SQL. In this guide, we will walk you through the process of creating a dedicated API user and assigning an API key using both manual and automated methods.
Step 1: Create a Dedicated API Contact
Before generating a key, it is a best practice to create a separate contact record for each service that will access your CRM. Using a dedicated "Service User" instead of your own administrator account ensures that if one service is compromised, you can revoke its access without affecting other integrations. It also makes your audit logs much cleaner.
- Navigate to Contacts > New Individual.
- Enter a descriptive name, such as "Attentive.ly Integration" or "Webform Service Account."
- Click Save.
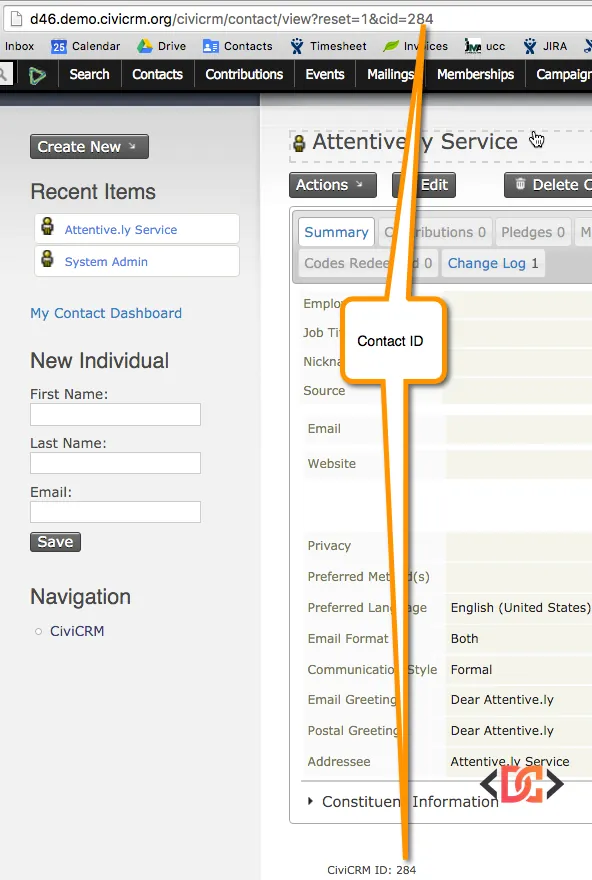
Once saved, you need to find the Contact ID for this new record. You can find this at the bottom of the contact page in small type, or by looking at the URL in your browser. For example, if the URL ends in ?reset=1&cid=456, the Contact ID is 456.
Step 2: Generate a Secure API Key
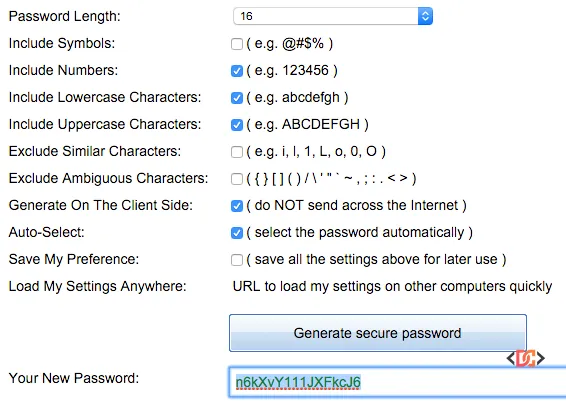
CiviCRM requires the API key to be a unique string. While the system is flexible, we recommend a 16-character random alphanumeric string. To ensure maximum security, use a password generator to create this key.
Avoid using special characters that might interfere with URL encoding in certain REST calls. A simple string of uppercase letters, lowercase letters, and numbers is ideal.
Step 3: Assign the API Key via API Explorer v4
The most modern and user-friendly way to assign an API key without database access is through the API Explorer v4. This tool allows you to perform "Update" actions on contact records directly through the CiviCRM interface.
- Navigate to Support > Developer > API Explorer v4.
- In the Entity dropdown, select Contact.
- In the Action dropdown, select update.
- In the Where section, click Add clause. Select id and set it equal to your Contact ID (e.g., 456).
- In the Values section, click Add value. Select api_key and paste your generated 16-character key into the box.
- Click Execute.
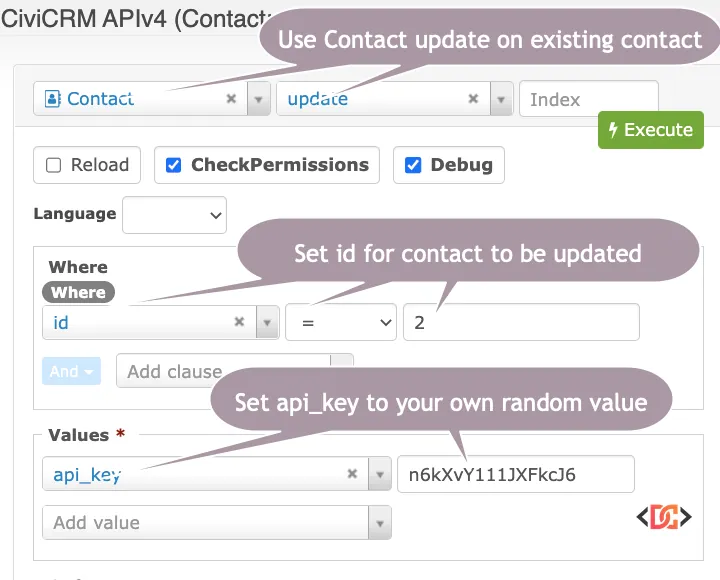
If successful, the API Explorer will return a JSON response confirming that the record has been updated. This contact is now officially authorized to use the REST API.
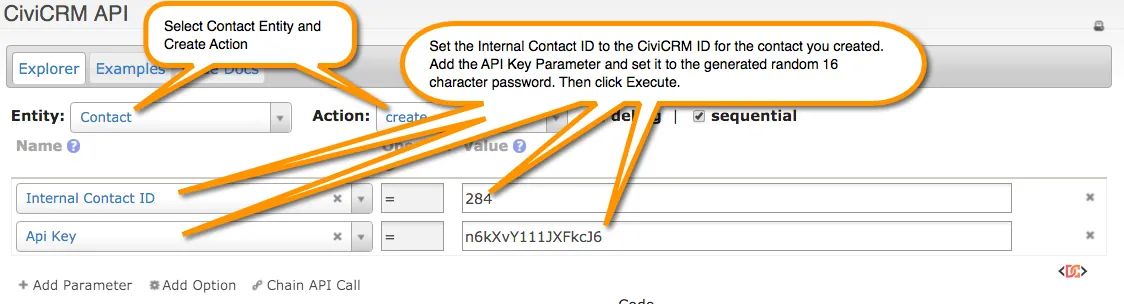
For Legacy Systems (API v3)
If you are working on an older CiviCRM installation (pre-version 5.x) or specific legacy extensions, you may need to use the API v3 Explorer. Navigate to Support > Developer > API v3 Explorer.
- Entity: Contact
- Action: Create (In API v3, 'Create' is used for both creating and updating records based on the ID)
- Parameters: Select
Contact ID(orInternal Contact IDin older versions) andapi_key.
Step 4: Using the API Key Extension
If you find yourself managing many API keys or want a more "native" feel for your administrative team, you can install a community extension that adds a dedicated API Key tab to every contact record.
The API Key extension by Cividesk simplifies this entire process. Once installed, you no longer need to use the API Explorer. Instead, you can simply view a contact, click the "API Key" tab, and enter or generate a key directly on that screen.
You can download the extension here: CiviCRM API Key Extension.
Important Security and Permissions
Simply having an API key is not enough to access data. The contact record associated with the API key must have the correct CMS Permissions.
Go to your CMS's permission management (e.g., WordPress Roles, Drupal Permissions) and ensure the role assigned to your API contact has at least the following permissions: - CiviCRM: Access AJAX API: Required for all REST requests. - CiviCRM: Administer CiviCRM: Often required for configuration-level API calls. - Specific Data Permissions: If the API needs to read contributions or edit events, ensure the user has "View all contributions" or "Edit all events" respectively.
Frequently Asked Questions
How long should a CiviCRM API key be?
While there is no hard limit, 16 to 32 characters is the industry standard for security. Ensure it is long enough to be unguessable but avoid special characters like & or ? which can cause issues when passed through a URL string.
Where do I find my Site Key?
Unlike the API Key, the Site Key is stored in your civicrm.settings.php file. Look for the constant CIVICRM_SITE_KEY. You will need both the Site Key and the User API Key to authenticate REST requests.
Can one contact have multiple API keys?
No, each contact record in CiviCRM has exactly one api_key field in the database. If you need multiple keys for different services, simply create multiple contact records.
Wrapping Up
Setting up an API key doesn't require advanced database skills. By using the built-in API Explorer or the dedicated API Key extension, you can safely and efficiently bridge the gap between CiviCRM and the rest of your software stack. Always remember to follow the principle of least privilege: give your API users only the permissions they absolutely need to perform their tasks.